How to Build an E-commerce Website Using Python?

Did you know that over 1.5% of all websites worldwide are powered by Python? This includes giants like Instagram and Dropbox. Python’s simplicity and rich frameworks have made it a go-to for developers building custom, scalable solutions—especially for e-commerce. In this Python e-commerce tutorial, we will ensure that you grasp the basics of building an e-commerce website using Python, step-by-step. This tutorial is ideal for anyone looking to create a fully functional and professional-grade building e-commerce website with Python.

Why Choose Python for E-commerce?

  • Python’s readability and rapid development benefits: Python’s clean syntax makes it easy for teams to build and scale e-commerce platforms faster. In fact, Python can reduce development time by up to 40% compared to other languages like Java or PHP. That’s why more developers are confidently developing e-commerce website in Python when they need to build fast and scale efficiently.
  • Strong ecosystem: Django, Flask, FastAPI: Frameworks like Django (with built-in admin, security ORM) and FastAPI (for speed) empower faster, secure web apps.
  • Active developer community and strong documentation: With over 15 million developers worldwide and extensive documentation, support is always available.
  • Scalability and integration capabilities: Python easily connects with databases, payment gateways, and APIs, making it future-ready for growing e-commerce needs.

Read More: Latest 10 Python Development Tips for Beginners

Choosing a Web Framework: Django vs Flask vs FastAPI

  • Django is like a full kitchen set—it comes with everything. It includes admin dashboards, user login systems, and database tools. Perfect for beginners building an e-commerce site like Amazon—where you need carts, product pages, and user accounts ready quickly.
  • Flask is more like building with Lego—you choose each piece. Great for small, custom apps like a product price tracker, but you’ll need to add login, database, and payment tools yourself.
  • FastAPI is ultra-fast and best for expert developers making backend-heavy apps like recommendation engines or AI-based price prediction for e-commerce. It’s not beginner-friendly, but it’s powerful.

Must-Have Features in a Python-Based E-commerce Website:

1. User Authentication:

Before shopping, users need to register and log in. As Amazon verifies you before letting you check out, Python (using Django) handles secure signups, passwords and sessions out of the box.

Product Model + Admin Panel Integration:

# store/models.py
from django.db import models

class Product(models.Model):
    name = models.CharField(max_length=200)
    price = models.DecimalField(max_digits=10, decimal_places=2)
    stock = models.IntegerField()
    image = models.ImageField(upload_to='products/')
    description = models.TextField()

    def __str__(self):
        return self.name
# store/admin.py
from django.contrib import admin
from .models import Product

admin.site.register(Product)

2. Product Catalogue (CRUD):

CRUD stands for Create, Read, Update, Delete. Sellers need to add new items, update prices, or remove sold-out products—just like Flipkart’s live catalog. Django’s admin makes this quick.

3. Shopping Cart & Wishlist:

Customers can save products or add them to the cart. Python lets you track these sessions—like how Nykaa remembers what you liked last week.

4. Order & Payment Integration:

Python connects to gateways like Razorpay or Stripe. So when you pay via UPI or card, the system knows exactly how to create an order, deduct stock, and send confirmation—as BigBasket does.

5. Admin Dashboard:

Business owners need a backend to track user’s orders and inventory. Django auto-generates a powerful dashboard—no extra code needed.

6. Security Measures:

Python frameworks offer built-in protection—blocking fake input, preventing cross-site attacks, and forcing HTTPS. It’s how apps like Zomato protect your payment info.

Read More: Step-by-Step Guide to Hiring Top Python Developers in 2025

Simple Guide to Setting Up Your Python E-Commerce Website:

1. Install Python and Create a Virtual Workspace:

First, download Python (use the latest version). Then, create a virtual environment using a simple command like python -m venv env. Think of this as a clean room where only your website’s tools live—so nothing else on your computer messes with it.

Project Setup & Virtual Environment:

# Terminal
python -m venv env
source env/bin/activate      # For Unix/macOS
env\Scripts\activate         # For Windows

pip install django
django-admin startproject ecommerce_project
cd ecommerce_project
python manage.py startapp store

2. Organize Your Project Like a Store:

Set up folders for things like products, users, and payments. Just like a store has sections, your website needs clear places for each part. This makes it easier to grow later.

3. Save Your Work with Git:

Git helps you keep track of every change you make—like saving every version of your homework. Use GitHub to store it safely online and share it with others. Whether you’re working solo or with a team, version control is essential in any Python e-commerce website development cycle.

How to Build the Key Features of an E-commerce Website Using Python:

Build Features of an E commerce Website Using Python

1. Models are Your Building Blocks:

Consider the models as blueprints. You’ll need models to define your products, categories, users, and orders. For example, a Product model can store the name, price, and stock of each item. Python frameworks like Django make it easy to build these with just a few lines of code.

2. Views & Templates = What the Customer Sees

Views connect your models to the front-end templates—like your product pages, cart, checkout, and login screens. When a user clicks “Buy,” the view processes it and updates the order.

# store/views.py
from django.shortcuts import render
from .models import Product

def home(request):
    products = Product.objects.all()
    return render(request, 'store/home.html', {'products': products})
<!-- templates/store/home.html -->
<h1>Product Catalog</h1>
<ul>
  {% for product in products %}
    <li>{{ product.name }} - ${{ product.price }}</li>
  {% endfor %}
</ul>

3. Admin Panel = Your Store’s Control Room

Django gives you a ready-made admin panel to add/edit products, track orders, or manage users—just like Shopify’s backend but customizable.

4. Database = The Storage Space

Start with SQLite (easy for testing) and move to PostgreSQL when scaling up—just like Amazon does to handle large volumes.

5. URLs & Routing = The Site’s Map

Define clear URL paths (e.g., /cart/ or /checkout/) so users can easily navigate your site.

Read More: Why is Python the Best Fit for Big Data? Why is Python a best fit for Big Data

How to Accept Payments on Your Online Store Using Python:

Stripe Payment Integration (Minimal):

# store/views.py
import stripe
from django.conf import settings
from django.shortcuts import redirect

stripe.api_key = settings.STRIPE_SECRET_KEY

def create_checkout_session(request):
    session = stripe.checkout.Session.create(
        payment_method_types=['card'],
        line_items=[{
            'price_data': {
                'currency': 'usd',
                'product_data': {
                    'name': 'Order',
                },
                'unit_amount': 2000,
            },
            'quantity': 1,
        }],
        mode='payment',
        success_url='https://yourdomain.com/success/',
        cancel_url='https://yourdomain.com/cancel/',
    )
    return redirect(session.url, code=303)
  • Start with Stripe or PayPal which are safe and trusted tools for online payments. For example, if you’re selling clothes on your website, Stripe lets customers pay using credit cards, UPI, or Google Pay. PayPal works well too—many buyers trust it and already have an account.
  • APIs Make Things Easy as it acts like a messenger between your website and the payment company. For instance, when someone clicks “Pay Now,” Python code can call Stripe’s API to open a payment page. Once payment is done, Stripe sends a message (called a “webhook”) to your site to confirm it.
  • Stay Safe and always use a secure site (HTTPS), never store card info yourself. You also need to turn on fraud protection tools like Stripe Radar or PayPal’s security features to block fake transactions.

Smart Tips to Build a Powerful E-Commerce Site Using Python:

Build Powerful E Commerce Site Using Python
  • Write clean, modular code – Break your code into smaller, reusable pieces. This keeps your site faster and easier to update. For example, if your payment logic is in a separate module, you can switch providers without rewriting everything.
  • Make it mobile-friendly – Over 70% of online shopping happens on phones. Use responsive design so your site looks perfect on any screen.
  • Backups and monitoring matter – Automate regular backups and use tools like Sentry or Prometheus to track issues early.
  • Don’t skip SEO and analytics – Use tools like Google Search Console and GA4 to track what users love—and what makes them leave.

Power-Up Your Python Store with These Advanced Add-Ons:

  • Security Checklist: Use django-environ, HTTPS, secure cookies, and CSRF protection.
  • Localization: Use Django i18n to support multi-language sites and currency.
  • Performance Optimization: Cache product pages with Redis and use a CDN for static assets.
  • AI Features:
    • Add product recommendations using collaborative filtering
    • Integrate a ChatGPT-based support bot
  • Business-Driven Development: Explain how to A/B test pricing, improve conversions, and retain users

Common Mistakes to Avoid:

  • Ignoring mobile responsiveness
  • Forgetting to run migrations after model changes
  • Storing API keys directly in code instead of .env files
  • Not testing payment callbacks or webhook failures

CTA – Build Smart, Scale Fast is the Keyword:

Whether you choose Django for its all-in-one ease or Flask for creative control, you now understand how Python shapes e-commerce success. Start small—maybe a product listing or user login—and improve as you go. Did you know over 1.6 million websites globally use Python-based frameworks? With Python, you don’t just build a store—you build long-term tech independence and the power to scale when the moment’s right. For businesses aiming to scale rapidly, the decision to  hire Python developers  can be a strategic advantage, ensuring your codebase remains efficient and future-ready.

FAQs:

Why should I use Python for building an e-commerce website?

Python is simple to learn and saves time in development. It has powerful frameworks like Django and Flask that make building e-commerce websites faster and more secure.

Which Python framework is best for e-commerce: Django, Flask or FastAPI?

Use Django if you want everything ready like admin panel, login system, and database setup. Flask is better for small custom apps. Fasthe tAPI is for experts who want very fast backend apps.

Can Python connect with payment gateways like Razorpay or Stripe?

Yes, Python can easily integrate with payment gateways. You can use APIs to connect with Stripe, Razorpay, or PayPal and accept UPI, cards, or net banking.

How do I start building an e-commerce website with Python?

First, install Python and create a virtual environment. Then choose a framework like Django, plan your project folders, and start building small features like user login or product list.

Do I need a database for my e-commerce site?

Yes, you need a database to store products, orders and user details. Start with SQLite for testing. Later, shift to PostgreSQL for better speed and scaling.

How to Use Laravel with React for Building Modern Web Apps

Beginners often ask: “Which stack impresses clients and gets the job done fast?” Laravel handles complex backend tasks like user log in, data storage, and security without writing everything from scratch. React makes the UI look smooth, fast, and modern—what clients love. Together, they solve the biggest pain: building apps quickly that look good and work well. With 70% of companies now using frontend-backend combos, Laravel + React is a smart choice. In this article, we’ll cover ‘how to use Laravel with React’, ‘how to connect React with Laravel’, and why clients prefer them together. Plus, how you can build full projects confidently. If you’re short on time or expertise, you can also choose to hire Laravel developers to get a head start with scalable backend systems.

Behind the Scenes & On the Screen – Laravel Meets React

To make the overview of Laravel and React simpler to grasp, imagine you’re building a house. Laravel is like the solid foundation and plumbing, handling all the behind-the-scenes work. So, for an App, it will handle user logins, databases, and security. It’s a powerful PHP framework with features like routing, ORM (Eloquent and built-in authentication. Thai makes backend development faster and safer.

On the other hand, React is like the front porch and interior design. It would be controlling what users see and interact with. Built by Meta, React helps create fast, interactive UIs using reusable components. If you’re looking to speed up development or need expertise for component-based UI, you may consider hiring React JS developers for efficient and visually engaging interfaces.

When you connect React to Laravel, you’re delegating them different responsibilities:

  • Laravel manages the logic and data, React handles the interface. This separation makes your app easier to scale, debug, and update. For example, you can tweak the frontend without touching backend code—saving time and avoiding errors.
  • Clients also love our Laravel with React tutorial, because the Laravel with React combo delivers both performance and visual polish.
  • For beginners, it’s a perfect way to learn modern development.
  • For clients, it means faster delivery and more reliable web apps

Compare Laravel and React to Other Popular Stacks:

StackBackendFrontendLearning CurveSpeed to DeployScalability
Laravel + ReactPHPReactModerateFastHigh
Node + ReactJSReactEasy (JS only)FastHigh
Django + VuePythonVueSteeperMediumHigh

How to Use Laravel with React:

Step by step guide to use Laravel with React
Image Source: Alvacommerce

Consider a situation where your client wants a modern website that looks great, works fast and handles things like user logins, payments and dashboards.

  • Laravel takes care of the heavy backend lifting, like securely storing data, managing users, and creating APIs.
  • React, on the other hand, builds the interactive, sleek frontend that users love. Together, they make your app both powerful and beautiful. In fact, many cross-platform mobile apps follow the same pattern—often developed with hire React Native developers in mind to ensure seamless native performance across devices.

Step 1: Installing Laravel – The Backend Foundation

To start, you’ll need to install Composer. This is nothing but a PHP package manager. Once that’s done, open your terminal and run this code: composer create-project Laravel/Laravel my-project.

This creates a new Laravel app with everything preconfigured that has basic routing, database setup, and security included. Laravel is popular because it saves time and makes code easy to manage.

Step 2: Setting Up React – The Dynamic Frontend

Now for the front end. First, ensure that you have Node.js and npm installed properly. You have two ways to use React with Laravel:

  • Option A: Integrate React Directly Using Laravel Mix
    Laravel Mix is already included. Run the code – npm install && npm install react react-dom
    Then, create React components inside resources/js/components, and Laravel Mix will compile them into your project using Webpack.
  • Option B: Create a Separate React App (Decoupled Architecture)
    Run: npx create-react-app frontend in a new folder.

This creates a separate React app that communicates with Laravel via APIs. This step is suitable for larger, scalable projects.

Before You Begin – The Key Tools Needed
Make sure these are installed:

  • Composer for Laravel
  • Node.js and npm for React and package management

Read More: Laravel vs NodeJS

Creating APIs in Laravel:

Creating APIs in Laravel

Let’s break it down simply. In modern apps, the frontend (like React) talks to the backend (like Laravel) using something called RESTful APIs.

Suppose API is a cafe waiter—you (React) place an order. The waiter (API) brings the data from the kitchen (Laravel). These APIs send and receive data using HTTP methods like GET, POST, PUT, and DELETE.

  • In Laravel, creating an API is easy. First, define a route in routes/api.php
  • This one line auto-generates multiple routes for actions like fetching all posts or deleting one.
  • Then, in your PostController, you create methods like index(), store(), and destroy() to handle each action.

In Laravel, routes act as traffic signs guiding requests. For example, Route::get(‘/users’, [UserController::class, ‘index’]); tells Laravel: when someone visits /users, show the list from UserController@index. Controllers are like workers handling tasks. Inside UserController, the index() method might fetch users from the database.

Laravel makes things even easier with Route::apiResource(‘users’, UserController::class). This single line automatically creates 7 RESTful routes (index, show, store, update, destroy, etc.)—ideal for APIs.

For a user management dashboard, instead of writing each route manually, apiResource generates everything you need for create, read, update and delete (CRUD). Laravel even handles route-model binding, validation and JSON responses automatically.

Read More: How Can Laravel Development Company Help You Increase Your Revenue?

Developer Tips: Performance, Debugging & Scalability

React Side:

  • Lazy load big components with React.lazy() and Suspense
  • Use React.memo for child components

Laravel Side:

  • Reduce DB queries with eager loading: User::with(‘posts’)->get()
  • Use php artisan config:cache and route:cache in production
  • Leverage Laravel’s rate limiting to protect APIs

How to Connect React with Laravel – Connecting Frontend to Backend

How to Connect React with Laravel Connecting Frontend to Backend

Step 1: Setting up Axios (or Fetch API)

To connect React to Laravel, you’ll need a tool like Axios or the built-in Fetch API. Axios is popular because it simplifies error handling and offers additional features. You would need to install Axios in your React project. Next, you have to set it up to send requests to your Laravel API.

For Example, Once Axios is set up, it allows React to communicate with Laravel, like fetching data from the Laravel backend. You can fetch user information from your Laravel backend and display it in your React component. You would set this up using Axios or Fetch within a React component’s lifecycle, such as when the component mounts.

Step 2: Handling CORS Issues:

When your React app (running on one server) tries to fetch data from the Laravel backend (on another server), you may face CORS. To make it simpler, it is called Cross-Origin Resource Sharing issues. This happens because modern browsers restrict requests made to different domains.

Solution – To solve CORS issues in Laravel, you’ll need to allow your React app’s domain. This can be done by configuring CORS in Laravel. You’ll use a CORS package like Fruitcake/Laravel-cors and update the configuration file. It’s done to ensure that your Laravel API accepts requests from the domain where your React app is hosted.

Step 3: React and Laravel Integration

Once Axios is set up and CORS is configured, your React app will be able to send requests (like fetching or posting data) to your Laravel backend smoothly. This setup enables the two parts of your app—React for the user interface and Laravel for the backend API.

CTA:

Ready to Build the Future of Web Apps? Read this before you start anythingIn 2025, React remains the top choice for frontend development, with 81.8% of JavaScript developers using it, according to the State of JS 2022 survey . On the backend, Laravel continues to be a leading PHP framework, favored for its elegant syntax and robust features.

Combining React and Laravel allows you to create dynamic Apps – whether it is a real-time dashboard, an e-commerce platform or a mobile app backend. Don’t just read—come and build it!

FAQs:

What is Laravel and how is it useful in web development?

Laravel is a PHP framework that helps you build the backend of websites—like login systems, databases, and APIs—quickly and securely, without writing everything from scratch.

Why use React with Laravel?

React makes your frontend (what users see) look modern and run smoothly, while Laravel handles the backend (like saving data). Together, they make your web app fast, scalable, and user-friendly.

Which method is better: React inside Laravel or separate app?

For small to medium apps, using React inside Laravel is quick and simple. For larger or mobile-ready apps, keeping React separate and talking via API is more flexible and scalable.

How to boost performance in React and Laravel?

Use lazy loading and React.memo() in React. In Laravel, cache routes and configs, and use eager loading in database queries to reduce load time.

What tools do I need to start?

You need Composer for Laravel, Node.js and npm for React, and optionally a code editor like VS Code. These tools help you build and manage your full-stack web app.

Is Laravel + React better than Node + React?

Laravel + React is great if you know PHP and want backend power with frontend style. Node + React uses only JavaScript, so it’s easier to learn if you already know JS. Both are fast and scalable.

How to Integrate Machine Learning in Android Apps?

Machine Learning (ML) is rapidly transforming mobile development, with Android apps leading the way. Ever wondered how ML is used in Android apps or what are real examples of ML in mobile development? Just look at features like Google Lens, smart replies that have very fast and smooth user interaction with ML, and even personalized news feeds — all are powered by ML.

As Android holds over 70% of the global mobile OS market in 2024, the demand for smarter apps keeps rising. With over 3.6 million apps on the Play Store in 2024 alone, developers are using ML to make smarter, faster, and more personal experiences.

This article will teach you step-by-step how to integrate machine learning in an android app. This would be done using tools like ML Kit Android, PyTorch Mobile / ONNX and TensorFlow Lite. Oh yes, no advanced expertise required for machine learning mobile development!

Machine Learning for Android – Concepts Tools & Use Cases

Machine learning mobile development lets Android apps adapt, predict, and act smartly — from suggesting replies in chats to scanning documents or identifying objects in photos. Android app development with machine learning empowers your business with personalization, voice recognition, fraud detection, and more.

There are two types:

  • On-device ML, which runs locally (faster, more private)
  • Cloud-based ML, which handles heavier tasks but needs the internet.
  1. TensorFlow Lite helps run bespoke ML models efficiently on mobile phones.
  2. ML Kit Android has plug-and-play features (face detection, translation, etc.)
  3. ONNX (Open Neural Network Exchange) lets developers bring pre-trained models from other platforms like PyTorch into Android apps very smoothly.

Choosing the Right Machine Learning Strategy for Android Apps:

Choosing the Right Machine Learning Strategy for Android Apps
  • Pre-trained models (like Google’s Face Detection API) are fast to implement.
  • Custom models offer control for unique tasks, as required for your business needs or target audiences.
  • Supervised learning trains models on labeled data (e.g., spam detection)
  • Unsupervised learning easily detects patterns without labels (e.g., customer segmentation).

For apps needing real-time performance or strong privacy, on-device inference is ideal — no internet delays or data leaks. According to Google, ML Kit’s on-device APIs process data in under 20ms, making it perfect for features like instant translations, barcode scanning, or live object detection.

Popular Tools & Libraries for Android ML Integration:

1. TensorFlow Lite (TFLite):

Core Features – allows efficient on-device ML, ideal for mobile apps with limited resources.

Use Cases – Perfect for product recommendation engines (predicting what users may buy next based on browsing history. It also works with dynamic pricing models (adapting prices in real-time based on market conditions).

Advantages – Model Conversion which means it can easily convert TensorFlow models into a lightweight format suitable for Android devices.

2. ML Kit by Google:

Core Features – Machine learning in Android Kit provides pre-built APIs for common tasks like image and text analysis.
Use Cases examples – 

  • Face Detection: For virtual try-ons (e.g., makeup or glasses to choose as per your face shape etc).
  • OCR (Optical Character Recognition) which means scanning and processing receipts, product labels or barcode information for faster checkout.
  • Language Identification as per the local language preferences for e-commerce sites to show localized content.

3. PyTorch Mobile / ONNX:

Core Features – allows developers to use models trained in PyTorch or other frameworks in Android apps using machine learning.
Use Cases examples

  1. PyTorch: Analyzing customer reviews to determine sentiment and improve product recommendations.
  2. ONNX: Running pre-trained models from other platforms in Android apps. It is ideal for incorporating complex predictive models that might come from external sources or research.

Read More: Android vs iOS, Which one is Best Platform for Mobile App Development

Step-by-Step: Integrating ML into Your Android App

Integrating ML into Your Android App

Prepare or Select a Model:

The first step is selecting a pre-trained ML model. For example, if you’re using TensorFlow, you can convert your trained model to TensorFlow Lite (TFLite) format. It is for better efficiency on mobile devices. TFLite models are optimized for smaller size and faster performance on Android. Otherwise, you can also use Firebase ML if you want a ready-to-use solution without managing models yourself.

Include the Model in the Android App:

To get the model into an Android app using machine learning, you’ll need to use Android Studio. Add the model file (like TensorFlow Lite) to your project’s assets folder. Then, modify your Gradle configuration to include dependencies for TensorFlow Lite or Firebase ML Kit. This will also be depending on the model you’re using.

Model Loading and Inference:

After adding the model in machine learning in android studio, you have to next load it into the app. This is termed as integrating machine learning in an android app. For example, using TensorFlow Lite, you load the model with a simple method like Interpreter interpreter = new Interpreter (modelFile);. Then, you can run Inference. It is nothing but a simple process where the model makes predictions based on the input data.

Handling Input & Output Data:

For tasks like image classification or text analysis during android app development with machine learning, you need to preprocess your input. This could be resizing images or converting text into vectors, before you pass these to the model. After running the inference, you postprocess the output. This could be the predicted label for an image or sentiment analysis for text.

Common Mistakes and How to Avoid Them in ML Android Apps:

  • Model too large → ✅ Use quantization + pruning
  • Inaccurate outputs → ✅ Check training data quality
  • App crashing → ✅ Confirm input/output dimensions match model expectations
  • Battery drain → ✅ Use batching, limit inference frequency, prefer on-device processing

Performance Optimization Tips for Android App Using Machine Learning:

Performance Optimization Tips for Android App Using Machine Learning

When integrating ML into Android apps, it’s important to optimize performance.

  • Quantization reduces the model size by simplifying data, helping it run faster on mobile.
  • Hardware acceleration like NNAPI (Neural Networks API)
  • GPU boosts speed by offloading heavy computations.
  • Keep an eye on memory and battery usage — ML models can drain power quickly

Performance Optimization in Practice – Real Tips That Work

  • Model Pruning: Removes unnecessary neurons or layers from the model to improve inference time without significantly sacrificing accuracy.
  • Delegates: Use GPU and NNAPI delegates in TensorFlow Lite to offload work from the CPU.
  • Batching Input: Instead of running the model on individual inputs, process in batches to reduce latency.
  • Memory Mapping: Use MappedByteBuffer to load TFLite models efficiently in Android.

Testing and Debugging Android App Development with Machine Learning:

To test ML features in Android apps, use Android Studio’s emulator to mimic real-world conditions.

Common issues include models not loading due to size or format and inaccurate predictions. These could appear when a recommendation app suggests unrelated products. This happens if the model isn’t trained on diverse, quality data.

Ethical Considerations & Data Privacy in ML Android Apps:

Modern Android apps must do more than just run smart models — they must also protect user data and ensure ethical usage. Here’s how:

  • On-device inference = better privacy (no data leaves the device).
  • Always ask for user consent before using camera/audio or sensitive inputs.
  • Implement fairness by auditing your ML model for biased outcomes (e.g., face detection failing on certain skin tones).
  • Stay compliant with GDPR/CCPA by avoiding storage of personally identifiable data.

This is a growing concern among users and developers alike, so covering it boosts your authority and trustworthiness.

5 Innovative App Ideas Using ML in Android (for 2025 and Beyond):

  1. AI-Powered Personal Health Assistant: Integrates phone sensors + ML for fitness/diet tracking.
  2. Smart Mental Health Chatbot: Uses NLP (Natural Language Processing) + sentiment analysis to detect stress/anxiety in user input.
  3. AI Interior Design App: Users scan their room and place furniture virtually using ML + AR.
  4. Resume & Job Matching App: Match candidates to jobs via NLP + classification algorithms.
  5. Image Enhancer App: Real-time image upscaling and noise reduction using GANs or deep learning.

Each of these app ideas aligns with current trends and has limited competition — great for developers looking to make an impact.

So, are you ready to Build Smarter Android Apps?

From personalized shopping to real-time language detection, ML makes your app faster, smarter, and more user-focused. The best part? You don’t need to be a data scientist to start machine learning in an Android studio! Come to Machine Learning which is no longer a luxury — it’s a game-changer. For businesses or entrepreneurs lacking in-house technical resources, it’s a smart move to  hire Android app developers  who are experienced in ML integration and Android optimization.

FAQs:

What is machine learning in Android apps?

Machine learning helps Android apps become smart — like suggesting replies, scanning images, or showing news you like. It learns from data and improves over time.

Can I use machine learning without being an expert?

Yes, you don’t need to be a big tech expert. Tools like TensorFlow Lite and ML Kit make it easy for beginners. Just follow some steps and you can use it in your Android app.

Which tool is better — TensorFlow Lite or ML Kit?

Use TensorFlow Lite if you want to make your own ML model. If you want quick and easy features like face scan or text reading, then ML Kit is better and ready to use.

How to make machine learning apps faster and smoother?

Use small size models and apply “quantization” to make it lighter. Also, run it on GPU or use NNAPI to save battery and make it work faster.

Is using machine learning safe in Android apps?

Yes, if you follow best practices like using on-device ML and asking user permission. Don’t collect personal data unless really needed and always keep it secure.

What are some unique app ideas using ML in Android?

You can make apps like health coach, job finder, or interior designer using ML. You can also build smart camera apps or personal chatbots for mental health.

How to Migrate from Magento 1 to Magento 2

Magento has long been a go-to platform for eCommerce businesses. It has been powering over 250,000 merchants globally thanks to its flexibility, scalability, and strong developer ecosystem. But in June 2020, Magento officially ended support for Magento 1. This has left thousands of online stores exposed to security vulnerabilities, outdated code and lack of technical support. Continuing on Magento 1 is like driving an old car with no seatbelts or spare parts. So we have to now move from Magento 1 to Magento 2, but without leaving our valuable data behind, right?

Upgrading to Magento 2 isn’t just a technical necessity—it’s a smart business move. With Magento data migration, you gain:

  • faster performance
  • enhanced security protocols
  • high-end and faster mobile responsiveness
  • features like advanced admin tools 
  • streamlined checkout
  • integrated SEO enhancements.

Today we will help you break down the easy steps on “how to migrate from Magento 1 to Magento 2”—step by step. But before we learn Magento 1 to Magento 2 migration steps, we need to find out why are we doing it this year:

Why Migrate to Magento 2?

1. Magento 1 Officially Reached End-of-Life in June 2020:

That means no more security patches, updates or official support. If you’re running a store on Magento 1, you’re wide open to data breaches, fraud and compliance issues like PCI-DSS violations. If you do not migrate customers from Magento 1 to Magento 2, then it is dangerous if you’re handling credit card transactions. Magento 1 websites experience 62% more attempted cyberattacks than stores running on Magento 2.

2. Enhanced Performance, Scalability, and Mobile Responsiveness in Magento 2:

Why Migrate to Magento 2

Magento data migration from 1 to 2 means add on speed and growth. It loads pages 50% faster and handles 39% more orders per hour. For example, if you’re running flash sales like a fashion brand or processing high traffic like electronics sellers, Magento 2 won’t buckle under pressure. Magento 2 checkout is 38% faster than Magento 1, improving cart abandonment rates by up to 27%.

3. Better Admin Interface, Improved Checkout and SEO Capabilities:

Magento 2’s admin panel is user-friendly—even for non-tech store managers. It also features a streamlined 2-step checkout and built-in SEO tools, improving conversion and visibility. Stores that upgraded to Magento 2 saw a 20% average increase in conversion rate within 3 months.

4. Access to Modern Extensions and Support Community:

Magento data migration gets you top-rated extensions today that are Magento 2-compatible only. Plus, the active developer community ensures regular updates and help. Magento 2 supports over 3,000 extensions, while Magento 1 is no longer supported by most extension developers.

Now we come down to Magento 1 to Magento 2 migration steps

Pre-Migration Planning:

Pre Migration Planning from Magento 1 to Magento 2
Image Source: Magento vista Amebaownd

Before jumping into the Magento 2 migration, you need a solid game plan. We are now sharing how to migrate from Magento 1 to Magento 2:

  • Start with a full site audit. Analyse what pages, features or workflows work well—like Amazon-style product filters—and what’s outdated. Remove clutter and streamline navigation.
  • List every extension, custom code, third-party theme and integration currently running. Tools like Magento Marketplace help check if your extensions have Magento 2-compatible versions.
  • Next, evaluate your hosting environment. Magento 2 demands more power—cloud hosting or scalable services like Adobe Commerce Cloud or Nexcess may be better options.
  • Decide whether you’re doing a clean rebuild (for better performance and UX) or a direct migration (for speed). For example, brands like Cox & Cox opted for fresh builds to unlock new features.

Finally, map a timeline and assign the right people—developers, designers, QA testers. Magento data migration from 1 to 2 can take 3–6 months, depending on complexity. Planning now saves chaos later.

Read More: How to Create a Custom Theme in Magento 2 – Step-by-Step

How to Set Up the Magento 2 Environment:

  1. Use a staging server by installing Magento 2 on a test (staging) server—not your live store. This helps you experiment safely.
  2. Install Magento 2 and for this you need to download Magento from the official site. Further on upload it to your server using a tool like FTP or cPanel.
  3. Set up requirements ensuring that your server has:
    • PHP (backend engine)
    • MySQL (stores product data)
    • Elasticsearch (speeds up product search)
  4. Check Compatibility to confirm your server supports the required PHP version (like 8.1), has enough memory (at least 2GB) and runs smoothly with Magento.
  5. Test Everything which means loading the sample data (like clothes or books) and test search, cart, and page speed.

Migrating Data from Your Old Store to Magento 2:

When you’re moving your online store from Magento 1 to Magento 2, you don’t want to start from scratch. That’s where the Magento Data Migration Tool helps. It helps smoothing the process of Magento Data Migration from 1 to 2 and you don’t lose anything.

The Role of Data Integrity in Magento Migration:
Data integrity is crucial to ensure no product or customer information is lost during the migration. The Magento Data Migration Tool helps preserve this integrity by mapping your data correctly and maintaining its structure.

What Gets Moved Over:

  • All your products (like T-shirts, bags, kitchenware)
  • Categories (e.g., “Men’s Shoes,” “Home Decor”)
  • You also migrate customers from Magento 1 to Magento 2 which means customer information (names, addresses, past orders)
  • Sales data (invoices, transactions)
  • Store settings (tax rules, shipping zones, etc.)

Step-by-Step Migration Process:

  1. First, backup your Magento 1 store—just in case anything goes wrong.
  2. Then, install the Magento Data Migration Tool on your server.
  3. Next, follow the steps to migrate:
    • General settings and configurations
    • Migrate all your data
    • Make new changes since the first copy (called incremental updates)
  4. Finally, fix any issues that pop up—like missing product attributes or mismatched IDs.

Important Note: This tool doesn’t migrate your website’s theme or extensions. So, if you have a custom homepage design or special features (like a Wishlist pop-up), you will need to rebuild or find Magento 2 versions separately.

Read Also: How Magento can help to boost your new or existing business?

Moving Your Store’s Look and Features to Magento 2:

Image Source: Pixelnet

When you upgrade to Magento 2, the design (theme) and extra features (extensions) from Magento 1 don’t carry over automatically—they’re built differently under the hood.

Themes- Whether to Rebuild or Replace?

Your old store’s look won’t work in Magento 2 as-is. So, you have two choices:

  1. Rebuild the same design using Magento 2 tools, if you want to keep the same look.
  2. Or, pick a new theme that’s already made for Magento 2. This saves time and may offer better performance.

Optimizing Magento 2 for Mobile:
Magento 2 offers several mobile-friendly themes and tools that allow you to optimize your store for mobile shoppers. By choosing a responsive theme and optimizing images, you ensure a seamless shopping experience on smartphones and tablets.

Extensions – Choose Only What You Need:

Go through your current store and make a list of the essential extensions. You will find things like product sliders, coupon tools, or review widgets. Then find Magento 2 versions of those. Magento data migration from 1 to 2 means you must skip any outdated or unsupported ones. The latter can cause errors or slow your new site down. This step among the Magento 1 to Magento 2 migration steps is key to giving your store a smooth, fresh start. It will ensure not dragging old issues into the new build.

Magento 2 Extensions to Boost Your Store’s Performance:
Magento 2 comes with several extensions that can enhance the functionality of your store. Some top extensions include:

  • Magento 2 Page Speed Optimizer to improve load times.
  • Magento 2 SEO Suite for enhanced search engine optimization.
  • Magento 2 One Step Checkout to simplify the checkout process.

CTA:

Migrating Magento 1 to Magento 2 takes strategic planning. But it’s worth it for a faster, safer store. Don’t wait—start today. Download our free migration checklist to get started right.

FAQ’s:

1. Why should I move from Magento 1 to Magento 2?

Magento 1 is no longer supported since June 2020. That means no security updates, patches, or support—your store is at risk. Magento 2 gives better performance, mobile support, and safety.

2. Will I lose my products or customer data during migration?

No, your data like products, categories, customers, and orders will be safely moved using the Magento Data Migration Tool. It keeps everything intact during the process.

3. Can I keep my current website design in Magento 2?

Magento 1 themes don’t work directly in Magento 2. You can rebuild the same design or choose a new Magento 2-ready theme for better speed and user experience.

4. How long does the Magento migration process take?

The full migration usually takes around 3 to 6 months. Time depends on your store size, number of custom features, and how well your team is prepared.

How to Create a Custom Theme in Magento 2 – Step-by-Step

A Magento 2 theme controls how your online store looks and feels, from homepage banners to product grids and checkout pages. To understand it better, consider it like a shop-front window — it’s the first impression for every visitor. Like, when you visit Amazon India during Prime Day, or Nykaa’s Pink Friday Sale, the colours, buttons, layouts and product displays are all managed by their theme. Custom themes are much more than looks — they directly affect loading speed, usability and how trustworthy your store feels.

Most shoppers in India use mobile phones. So when you create a theme, make sure it’s mobile-friendly and loads quickly. Google ranks fast websites higher. Nykaa and Flipkart optimize their themes with compressed images and clean CSS to stay ahead.

Before we come to how to create a custom theme in Magento 2, lets us now know a few necessary things:

For Indian ecommerce sellers, a tailored theme allows you to align with local trends — like creating festive layouts for Diwali, adding cash-on-delivery icons or showcasing regional language banners.

Developers who build themes enable sellers to stand out in a crowded marketplace. Which means that even small tweaks like image placements or add-to-cart buttons can increase sales. For businesses, good design equals brand power and better customer retention. That’s why companies investing in custom Magento themes often explore bold strategies like integrating with Magento 2 Extensions Development to unlock advanced features and flexibility.

Why Magento 2 Theme Development Matters in India:

Magento 2 powers some of the most scalable and performance-focused eCommerce stores in the world. In India, where shopping experiences are influenced by cultural trends, festivals, payment preferences, and mobile-first usage, creating a custom Magento 2 theme is not just a visual update — it’s a business strategy.

According to Statista, over 82% of Indian eCommerce traffic comes from mobile. A responsive, festive, and fast-loading theme can increase customer trust, reduce bounce rate, and maximize conversions.

Pre-requisites of Theme Creation in Magento 2:

Theme Creation in Magento 2

The following skills will help you handle everything from layout tweaks to adding product banners:

  • Before you start, you’ll need a working Magento 2 installation. This step for Magento 2 theme development, needs to be done either on your local machine or a web server.
  • You should also be familiar with basic web languages like HTML, CSS and XML.
  • Plus, you must know how to access and edit files in your Magento directory.

Understanding Magento’s Theme Structure:

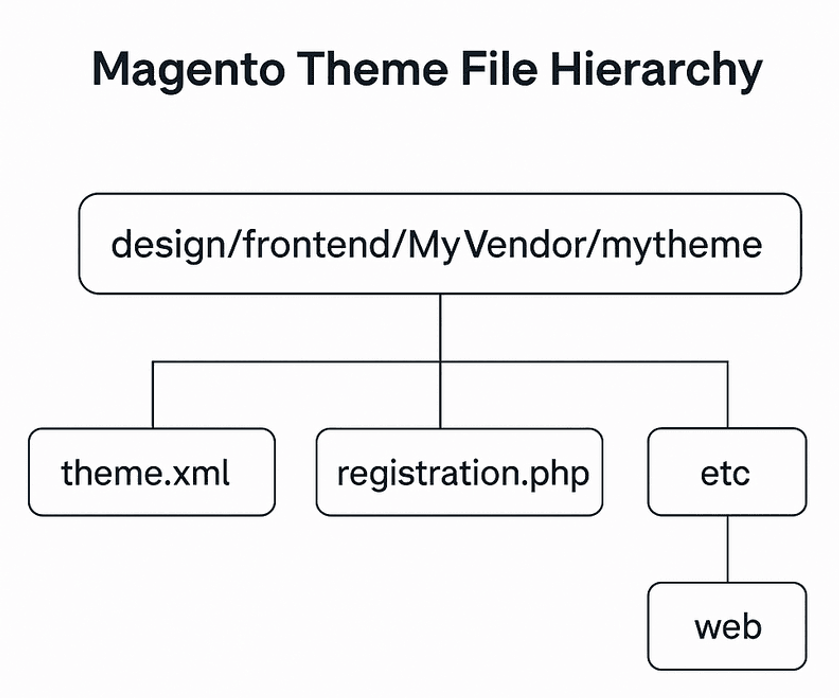
Magento Theme Structure (2)

Magento stores all themes inside the design frontend directory. This structure ensures every visual change — from the homepage slider to product thumbnails — stays organized and reusable.

  • For example, if you’re designing a site for selling sports shoes:
  • Your theme defines where product titles, price tags and add-to-cart buttons appear.
  • The theme.xml file provides key metadata like the theme’s title, its parent theme (often Luma), and a preview image for admin selection.
  • Registration.php is another critical file, telling Magento to register your theme for use during setup upgrades.
  • Static assets like CSS control product card designs, JavaScript adds interactivity (like hover effects on images) and image folders store assets like promotional banners for limited-time sales.
  • The layout and template folders decide where and how your product information is shown — for example, highlighting a “50% Off” badge on men’s watches or showcasing a “New Arrival” ribbon for summer kurtas on your homepage.

If you’re planning to modernize your store while keeping your current content, Magento 2 Migration Services can be a smart step before diving into full theme customization.

Read Also: Guide on How To Hire a Magento Developers With Expert Tips & Questions To Ask

Step-by-Step Theme Creation for Magento 2 with Real Ecommerce Examples:

When you run an online store, your design defines your brand. To create custom theme in Magento 2 step by step, you have to think of, for example Amazon’s clean layout or Nike’s bold website — both follow strict theme structures. Magento lets you create your own theme and here’s exactly how to do it.

1. Create Vendor and Theme Folders:

The first step for custom themes in Magento 2: Let’s say you run an online store called MyVendor and you are launching a special theme for your summer shoe collection. Go to the design folder, open the frontend folder and create two new folders. Name the first folder MyVendor and name the second folder mytheme. This helps Magento keep your themes neat and linked to your brand, just like how Zara uses specific themes for seasonal sales.

2. Define the Theme Configuration:

Doing this is a must in Magento theme 2 development. Open the mytheme folder and create a new file called theme dot xml. This file tells Magento your theme’s name, which existing theme it builds on, and the image you want to show in the admin preview. For example, for your shoe store theme, your theme dot xml might look like this:

  • Title is My Custom Shoe Theme
    – Parent is Magento Luma
    – Media preview image is media preview dot jpg

This helps Magento identify the design setup and lets you reuse Luma’s base code. Big ecommerce stores, like Flipkart, often reuse parent themes. Especially during new launches this helps save time and ensure stability.

3. Register the Theme:

Step by Step Theme Creation for Magento 2
Image Source: Cloudways

Just creating a theme isn’t enough, you need to register the Magento custom theme.

Inside the mytheme folder, create a new file called registration dot php. This file registers your theme with Magento so it shows up during setup. The script tells Magento your theme name and location. When you run setup upgrade later, Magento will list MyVendor mytheme as available. This is similar to how Shopify detects a new uploaded theme in its backend.

4. Set Up View Configuration:

Inside the mytheme folder, create an etc. folder and then create view dot xml. This file controls your product images. Suppose you want product images for shoes to show as three hundred pixels by three hundred pixels. You write that inside view dot xml. If your store runs a new handbag collection, you can change this to five hundred by five hundred. Brands like Nykaa and Ajio often use this logic to serve optimized images for mobile and desktop views. This is a very crucial steps for theme creation in Magento 2.

5. Add Basic Styling and Static Assets:

Inside the mytheme folder, create a web folder. Inside the web, create four folders named css, fonts, images, and js. These folders will hold your website’s styles, icons, product photos, and JavaScript code. Always use LESS files instead of plain CSS files. LESS makes it easier to manage large stylesheets, just like Amazon uses preprocessors for consistent and scalable design.

If you’re also planning to enhance performance and introduce better UX interactions, Magento 2 upgrade services can support your theme by keeping your store fast and secure.

6. Override Layout or Template Files:

If you want to replace the default Magento product page, create a Magento catalog folder inside your mytheme folder. Inside that, add templates or layout files.

Suppose you want to show a limited edition badge on your shoes. You can copy the original product view template into your mytheme folder and add the badge code. This is how online stores highlight best sellers, new arrivals, or flash deals. Another crucial stage of Magento 2 theme development.

7. Activate the Theme:

Log in to your Magento admin panel, go to Content, then Design and then Configuration. Pick your store view and select My Custom Shoe Theme from the list. If you want to activate the theme using commands, you can set the theme using Magento CLI. Larger stores like Pepperfry use it during deployments.

8. Run Setup and Deploy Commands:

Setup and Deploy Commands in Magento 2

Now open your terminal and run three important commands.

  • Run setup upgrade to register your theme.
  • Flush the cache so old data is removed.
  • Deploy static content to load CSS and images properly.

This process of theme creation in Magento 2 is just like Myntra running a refresh before their End of Season Sale goes live.

Read Also: Magento vs Shopify: How to Choose the Right E-commerce Platform?

Make Your Magento 2 Theme Festive-Ready for Indian Holidays

Indian shoppers spend big during Diwali, Eid, Christmas, and Independence Day. With Magento, you can create seasonal child themes under your base theme. Here’s how:

  • Use Diwali-themed banners with gold and maroon colors
  • Add a tricolor badge on the homepage during Republic Day
  • Highlight “Festive Combo Deals” with layout updates
  • Show “Pay with UPI” and “Cash on Delivery” icons prominently
  • Schedule theme activations via CLI before events

CTA:
To create a custom theme in Magento 2  isn’t just about creating a design — it’s a business strategy. Studies show 75% of users judge a company’s credibility based on website design alone. As per STATISTA, in India, where 82% of ecommerce traffic comes from mobile. In short, your theme can make or break sales. Ready to create a storefront that truly sells? Get in touch with us!

FAQ’s:

1. Can I create multiple custom themes for different store views in Magento 2?

Yes! Magento allows you to assign different themes for different store views — perfect for multilingual or regional stores.

2. What’s the difference between a parent theme and a child theme?

A parent theme (like Luma) contains reusable code. A child theme extends it with customizations while preserving upgrade compatibility.

3. Is it necessary to use LESS over CSS?

Yes, Magento 2 prefers LESS because it supports modular and scalable styling — making it easier to manage large designs like Flipkart or Amazon.

4. How do I test if my theme is responsive?

Use browser developer tools or tools like BrowserStack to test your theme across devices. Mobile-first design is critical in India’s mobile-heavy market.

Magento vs Shopify: How to Choose the Right E-commerce Platform?

Choosing the right e-commerce platform is a must for your business’s success. In the United States, Shopify leads with a 28.41% market share, powering over 2.8 million websites. Magento, while offering extensive customization, holds a smaller share.

But then which is better? “Is Magento better than Shopify? We are now providing a detailed Magento vs Shopify comparison to help you make a well-informed decision.

Overview of Magento:

Overview of Magento

Magento is an open-source e-commerce platform. It is world-famous for its flexibility and scalability. For a long time, it has been serving businesses of various sizes. As of the second quarter of 2024, there were approximately 144,477 active online stores operating on Magento. It reflects its significant adoption in the e-commerce landscape.

The platform offers extensive customization options. This means you can customize your online stores to specific business needs. Magento Development’s modular architecture has a wide range of extensions and API integrations. This propels functionality and user experience. Despite facing competition from platforms like Shopify and WooCommerce development, Magento maintains a notable market presence. This is particularly among larger enterprises seeking advanced e-commerce solutions.

Hire Magento Developer to take full advantage of Magento’s customization and scalability features.

Read More: Guide to Hiring Magento Developers

Overview of Shopify:

Overview of Shopify

Shopify helps businesses urgently create as well as easily manage e-commerce stores. In late 2024, Shopify reported a 26% increase in revenue, reaching $8.88 billion. This underlines how it has rapid growth and market prominence.

The platform has a user-friendly interface and a complete vast suite of tools. So far it has 900,000 plus merchants worldwide, ranging from small startups to large enterprises.

Shopify Development integrates artificial intelligence, exemplified by its “Shopify Magic” suite, which automates tasks. These tasks include key ones like generating discounts and product descriptions, which propels merchant efficiency.

During the Black Friday and Cyber Monday weekend in 2024, Shopify merchants achieved a record $11.5 billion in sales. It shows the platform’s capacity to support high-volume transactions.

Read More: Benefits of Shopify’s Mobile App for E-Commerce Businesses

Understanding Your Business Needs Before Choosing an E-commerce Platform:

  • Know your products, customers and expected sales
  • See if you need coding skills or if it’s easy to use
  • Check if the platform can grow with your business in the future
  • Ensure it works with payment, shipping and marketing tools
  • Compare costs, including hidden fees and transaction charges
  • Look for strong security, good support and legal compliance

Magento or Shopify: Which Platform Suits Your Business Model?

Which Platform Suits Your Business Model? Magento or Shopify

We are explaining this with two cases studies:

John and Michelle, two passionate entrepreneurs, set out to build online stores but had different needs and that’s where lies the key difference between Magento and Shopify.

John, launching a niche fashion brand, valued simplicity. He chose Shopify, an easy-to-use platform with built-in tools. This let him focus on marketing rather than coding. With Shopify’s secure hosting and 24/7 support, his store was live within days.

Michelle, running a tech accessories business, needed customization and control. She picked Magento vs Shopify, because the former is an open-source powerhouse offering flexibility. With a developer’s help, she built a customized e-commerce store. She integrated selective features and managed high traffic. Though Magento required more resources, it allowed unlimited scalability.

Magento vs Shopify comparison: Their choices reflected their business needs—Shopify for quick setup and low maintenance, Magento for advanced customization and control.

Read More: WooCommerce vs Magento

Magento vs. Shopify Comparison: Key Differences

1. Ease of Use:

The key difference between Magento and Shopify! Anyone can set up an online store without coding with Shopify but not with Magento. For example, a small clothing brand like Trendy Tees can launch its Shopify store in a day. Magento needs developers. A large retailer like Nike India uses Magento because they have a tech team to manage the platform.

2. Customization and Flexibility:

Customization and Flexibility in Magento & Shopify

Magento vs Shopify – Magento allows deep customization. A Luxury Watches Co. can create custom product pages, advanced checkout flows and special loyalty programs. Shopify offers some customization but with limits. An Organic Beauty Hub can change themes and use apps but cannot modify the system at the same level as Magento.

3. Cost Implications:

    When it comes to costing, is Magento better than Shopify? Shopify has a monthly fee starting at $29, including hosting and security. A handmade jewelry business can budget easily. Magento’s open-source version is free, but businesses must pay for hosting, security and developers. A big brand like Ford can afford Magento’s higher development costs.

    4. Scalability:

      Magento or Shopify? Shopify handles traffic spikes well. For instance Gadget Mart, which sees high Black Friday sales, won’t have website crashes. Magento needs strong hosting. Global Electronics, selling worldwide, invests in powerful servers to manage growth.

      5. B2B Features:

      B2B features in Magento and Shopify

        Magento supports B2B sales better. A wholesale furniture supplier can offer bulk pricing, custom orders, and multiple payment options. Shopify relies on apps for B2B, so a custom packaging company may need extra tools for bulk orders.

        6. Performance and Speed:

          What more for Magento vs Shopify? Latter is optimized for fast loading. For instance Pet Essentials, a small pet store, benefits from this. Magento sites depend on hosting. If Mega Tools, a hardware store, uses slow servers, their site may lag.

          7. Security Measures:

            In terms of safety, is Magento better than Shopify? Shopify handles security, including SSL and PCI compliance, making it safer for small businesses like a BabyCare Store. Magento users manage security themselves, which is why big companies like Land Rover invest in cybersecurity teams.

            8. Themes and Design:

            Themes and Design of Magento & Shopify

              Shopify offers pre-designed themes. So a Floral Decor store can choose a template and launch quickly. Magento allows full design control. A high-end fashion brand like Elite Couture can create a completely bespoke design.

              Pros & Cons of Magento vs Shopify:

              Pros of Magento:

              • Highly customizable platform for bespoke e-commerce experiences
              • Advanced API integrations for smooth third-party tool connections
              • Flexible theme customization for unique store designs
              • Strong security features, assuring data protection and compliance
              • Scalable for large businesses with complex product catalogs

              Cons of Magento:

              • Requires technical expertise, making it less beginner-friendly
              • Higher maintenance costs, including hosting and security management
              • Slower setup time compared to Shopify

              Pros of Shopify:

              • User-friendly with an excellent user experience
              • Shopify Plus has advanced features for enterprise-level businesses
              • Built-in Shopify POS for stress-free online and offline sales
              • Strong security features
              • Easy theme customization with a vast template library

              If you’re looking to set up a Shopify store with custom features, Hire Shopify Developer to ensure seamless integration and optimization.

              Cons of Shopify:

              • Limited flexibility compared to Magento’s customizable platform
              • Advanced API integrations require additional costs or third-party apps
              • Shopify transaction fees apply unless using Shopify Payments

              Conclusion:

              Shopify is great for small to mid-sized businesses needing an easy-to-use platform. Magento is best for large companies needing advanced customization and a tech team. If you wish to set-up an e-commerce store or have more queries about Magento vs Shopify comparisons, you can always write to us.

              FAQ’s:

              1. What is the main difference between Magento and Shopify?

              Shopify is easy to use and best for beginners, while Magento is for businesses needing advanced customization. Shopify requires no coding, whereas Magento needs developers for setup and management.

              2. Which is better for small businesses, Magento or Shopify?

              Shopify is better for small businesses as it has ready-made tools, secure hosting, and an easy setup. Magento is more suited for big businesses that need custom features.

              3. Is Magento more expensive than Shopify?

              Magento’s open-source version is free, but you need to pay for hosting, security, and developers. Shopify has fixed monthly plans starting at $29, which include hosting and security.

              4. Which platform is better for large businesses?

              Magento is better for large businesses as it allows full customization, advanced B2B features, and scalability. Shopify Plus is also an option but has fewer customization options than Magento.

              5. Can I customize my Shopify store like Magento?

              Shopify offers themes and apps for customization, but it has limits. Magento gives full design and feature control, making it better for businesses that need unique customization.

              6. How do I decide between Magento and Shopify?

              If you need a simple, hassle-free store, go for Shopify. If you need advanced customization and have a development team, choose Magento. Consider your budget, business size, and technical skills before deciding.

              How To Be Successful on Shopify – Shopify Tips for Beginners

              Did you know that a whopping 80-90% of Shopify stores fail within their first year of inception? This high failure rate is often due to sketchy planning, proficient product choices, and skimpy marketing strategies. For beginners, steering these challenges without guidance can be tough. So how to run successful Shopify stores?

              We are now sharing a comprehensive guide full of e-commerce development tips on how to run a successful Shopify store to help new store owners.

              Is Shopify Easy for Beginners?

              Shopify is easy for beginners because of multiple factors:

              • A simple design and ready-made templates. 
              • You can create an online store without coding. All you need to do is, just drag and drop templates etc, like adding a product or changing colors. 
              • Automatic handling of payments, shipping, and inventory
              • 24/7 customer support and guides to help you. 

              But then if it has so many easy features, then why do Shopify Stores Fail often? Further, read for a comprehensive Shopify guide for beginners:

              Read Also: A Complete Guide Build a Successful Fashion Shopify Store

              Reasons Why Shopify Stores Fail?

              If you ask us how to be successful on Shopify, then you have to avoid the following blunders in totality. We are listing some Case Studies (names changed for privacy) as Shopify tips for beginners to make them understand in a better way:

              1. Lack of Well-Defined Goals:

              Lack of Well-Defined Goals

              How to run a successful shopify store? Have clear goals – clear sales target, dynamic marketing plan and properly planned advertising. Without direction, they waste money on ads that don’t work or stock products they can’t sell. For example, Mrs. Aggrawal launched a fashion store but had no goal beyond “making money.” She didn’t track sales or customer preferences, leading to confusion and failure.

              2. Insufficient Market Research:

              Tom Jenner loved handmade candles, so he opened a Shopify store selling them. The problem? He didn’t check if people were actually searching for his designs. Without research, he targeted the wrong audience. This made him also set the wrong prices; no wonder he ended up with very low sales. Successful Shopify stores study customer needs, competitors and pricing before launching.

              3. Poor Product Selection:

              Ensuring security builds customer trust

              Just because a product is trendy doesn’t mean it will sell. Jake Bison of Buffalo, USA picked fidget spinners when they were fading in popularity. His store struggled because buyers had already moved on. Choosing the right products means checking demand, seasonality as well as competition.

              4. Lack of Planning:

              If you are excited to launch her Shopify store but skip planning logistics, good marketing, and fine budgeting – in that case when orders seep in, you will end up struggling with shipping delays and customer complaints. Successful Shopify stores always have a solid plan ensure smooth operations. This would be avoiding surprises that sink new businesses.

              Other Reasons are:

              • Poor Mobile Optimization – Most people shop on phones. If a store is hard to use on mobile, customers leave.
              • Giving Up Too Soon – Some quit after a few weeks if they don’t see sales. Success takes time and effort.
              • Losing Customer Trust via Bad Service – Zero or bad reviews, no refund policy or incomplete contact details make buyers suspicious. Also, ignoring customer emails or sending late orders creates bad reviews. A store without these feels risky, so people don’t buy.

              Read More: BigCommerce Vs. Shopify

              Proven Tips to Be Successful on Shopify:

              Starting a Shopify store is exciting, but success requires more than just launching a website. Success on Shopify isn’t luck—it’s strategy. With 75% of shoppers judging credibility by design, 88% relying on reviews, and data-driven stores being 23x more successful, your focus should be clear. Here is how to run a successful Shopify store: 

              1. Master the Fundamentals:

              testing img 1

              Radhika Reddy, a baker, started an online store selling custom cakes. She built her Shopify site but struggled with sales. Why? She didn’t learn the basics—SEO, product listings, and payment setup. Once she optimized product descriptions and enabled multiple payment options, sales improved. Mastering Shopify’s tools, and Shopify setup – including inventory management and shipping settings, lays a strong foundation. There are ample Shopify tutorials online for you to learn all this for free!

              2. Build Trust and Reliability:

              Mark’s tech gadget store had many visitors but few buyers. The issue? No reviews, no return policy, and a missing “About Us” page. Customers feared getting scammed. After adding clear policies, customer testimonials, and live chat support, Sales conversion happened instantly. Trust comes from transparency, quality service, and secure payment options.

              3. Carve Out Your Niche:

              This is among the top and key Shopify tips for beginners. Suppose you start selling generic fashion items; you are bound to face stiff competition. But if you switch to much-min-demand, eco-friendly yoga wear, it means you will be targeting a specific audience. Instead of competing with big brands, focus on a niche where you can stand out.

              4. Optimize Your Store for Conversions:

              Seamless Shopify integration for maximum efficiency

              Shopify guide for beginners always advises that you take care of your website the way you take care of your child. The website has to be quick, and clear listing/details of products and policies. Plus an easy checkout process is a must. Once you have improved speed, added high-quality images, and simplified checkout, the sales conversion rate almost doubles. If needed, hiring a Shopify Developer can help optimize the store’s performance and user experience.

              5. Leverage Data Analytics:

              Maria struggled to grow her online jewelry business. She used Shopify’s analytics Shopify drop shipping and proper inventory management. She soon noticed most visitors left without buying. By analyzing traffic sources, she focused on Instagram ads, improved product pricing, and ran retargeting campaigns. Sales grew by 40%. Tracking data helps identify what’s working and what’s not.

              Read More: Benefits of Shopify’s Mobile App for E-Commerce Businesses

              Signs of a Successful Shopify Store:

              Signs of a Successful Shopify Store

              1. Positive Customer Reviews:

              Happy customers leave good reviews. For example, if Sarah’s skincare store gets five-star ratings for fast delivery and quality products, new buyers trust her store more.

              2. High Customer Retention Rates:

              A great store brings customers back. If Mike’s coffee shop gets repeat buyers because of loyalty rewards or excellent service, he’s doing well.

              3. Consistent Sales Growth:

              Success means steady sales, not just one-time spikes. Emma’s fashion store growing from 10 to 100 orders per month shows she’s on the right path.

              4. Strong Brand Recognition:

              If people remember your store, it’s a win! Jake’s sneaker brand becomes known through Instagram and word-of-mouth, making his store stand out.

              Conclusion:

              Success on Shopify isn’t luck—it’s about creating a dynamic strategy. Master the basics, build trust, find your niche, optimize for conversions, and use data to refine your approach. Follow these steps and you will not have to ask anyone how to run a successful Shopify store!

              FAQ’s:

              1. Is Shopify easy for beginners?

              Yes, Shopify is beginner-friendly. It has ready-made templates, drag-and-drop features, and automatic handling of payments, shipping, and inventory. You don’t need coding knowledge to start a store.

              2. Why do most Shopify stores fail?

              Many fail due to poor planning, bad product choices, and weak marketing. Not doing proper market research, choosing trendy but non-demanded products, and giving up too soon are common reasons.

              3. How can I make my Shopify store successful?

              Set clear goals, research your market, pick the right products, and build trust with good customer service. Also, optimize your store for mobile users and work on marketing strategies like SEO and ads.

              4. What are the signs of a successful Shopify store?

              Positive customer reviews, repeat buyers, consistent sales growth, and strong brand recognition are key signs. If people trust your store and keep coming back, you’re on the right track.

              5. How long does it take to be successful on Shopify?

              Success takes time and effort. Some stores see results in months, while others take a year. Consistent marketing, great products, and customer service are key to long-term success.

              Is Node.js Still Worth It in 2025? Advantages and Disadvantages Explained

              Today we are here to showcase a complete ABC of Node.js which is an open-source runtime built on Google’s V8 engine. The features of node js enable fast, scalable web development with non-blocking I/O.

              The 2024 Stack Overflow survey reported over 50% of developers use Node.js in production. This is because it powers real-time apps and microservices for companies worldwide due to excellent node js performance. Plus its extensive NPM library and ease of use drive its popularity in modern web development, making node js for web development essential.

              What is Node.js?

              Node JS framework

              Node.js is a very trusted runtime environment for running JavaScript that too outside a web browser for server-side development. It uses Google’s V8 engine for fast performance.

              The features of node js support non-blocking, event-driven programming. This design helps handle many tasks at once. It is ideal for web servers, real-time apps and microservices.

              Web developers use one language for both front-end and back-end code. Node.js has a large library of modules via NPM. Node js performance is excellent on various platforms. It is used worldwide for building fast, scalable applications. Node js for web development is trusted by millions globally.

              Now let’s move on to the pros and cons of node js….

              Top 5 Advantages of Node.js:

              Node.js offers many benefits for modern web development. We are not listing the key advantages that make node js for web development a top choice!

              1. High Performance & Speed:

              high speed performance with nord js

              Node.js performance is exceptional as it uses a fast V8 engine to compile and run code quickly. It uses non-blocking I/O and asynchronous programming. For example, a web server can handle many requests at once that too, without waiting for every other task to finish.

              2. Scalability for Large Applications:

              The features of node js can manage many connections at the same time. It uses clustering to distribute tasks across multiple CPU cores. This helps build apps that grow with user demand. For instance, social media sites use Node.js to serve thousands of users efficiently.

              3. Full-Stack JavaScript:

              Full Stack Javascript

              The use of full-stack JavaScript by node js for web development, is also an important benefit. Developers write both client-side and server-side code in the same language for web development. Full-stack development reduces the requirement to learn different languages. This speeds up development. Small startups and big companies alike enjoy this simplicity of node js performance.

              4. Rich Ecosystem & NPM Packages:

              Node.js features have a rich ecosystem. It also has many NPM packages. Developers can use thousands of open-source libraries for adding features quickly by using node js for web development. For example, Express and Socket.io simplify web and real-time development by offering ready-made solutions.

              5. Real-Time Application Support:

              Finally, features of node js support real-time applications well. It allows data to be exchanged instantly between the server and client. Chat apps and online games use this feature to provide fast, live updates. Overall, Node.js is a powerful tool that offers high web performance, scalability, simplicity of features, a vast package ecosystem and powerful support for real-time applications.

              Must Read: Node JS vs Python

              Top 5 Disadvantages of Node.js:

              Disadvantages of Node.js

              Node.js might be a popular tool for building web applications. However, there are some disadvantages of node js as well:

              1. Single-Threaded Nature:

              Node.js uses a single thread to handle tasks. This means it can do only one thing at a time. When you run a heavy task, such as complex image processing or data crunching, the entire server may slow down during node js performance. For example, a heavy computation can block the event loop and make the app unresponsive.

              2. Callback Hell & Asynchronous Complexity:

              Node.js architecture relies on asynchronous code and callbacks. This can lead to “callback hell.” Many nested callbacks make the code messy and hard to follow. It is crucial among the key disadvantages of node js because beginners often find it confusing. For instance, tracking the flow of data through many callbacks is not easy.

              3. Security Concerns:

              Features of node js have many third-party modules available through npm. Not all modules are well maintained. Some may have security vulnerabilities. This can put your app at risk if you use an untrusted package. For example, an outdated module may expose sensitive data.

              4. Unstable API Changes:

              The API (application programming interface) in Node.js can change frequently. New updates may break your existing code. Developers must often modify their code to keep up with the latest version. This can slow down development and add extra work for node js performance.

              5. Limited Multi-Threading Support:

              The features of node js do not support multi-threading in the same way as some other languages. It struggles with heavy computation tasks. Although you can use clusters or worker threads, these solutions are not as simple as true multi-threading.

              Must Read: Laravel vs NodeJS

              Now that we have clearly listed the advantages and disadvantages of node js, you must be aware when to use node js and when not. Let’s discuss that:

              When To Use and Not To Use Node.js?

              Node.js usage guidelines and limitations

              Node.js features are ideal for real-time, I/O-intensive applications only.

              • Use it for chat-based apps, live streaming and online gaming web development or applications.
              • Works well in microservices and RESTful APIs.
              • Many companies worldwide use Node.js for fast, scalable systems. For example, LinkedIn and Netflix use it to manage high traffic.
              • Do not use Node.js for CPU-heavy tasks. It may slow down during complex computations.
              • Avoid it for video processing, large-scale data analysis or heavy mathematical calculations. In such cases, languages like Java or C++ are more suitable.
              • Choose Node.js when low latency and high concurrency are key.

              Is Node.js Right for You?

              In summary, Node.js stands out in the world of web development. Evaluating the advantages and disadvantages of node js shows clear node js pros and cons that will help you boost its performance. With a balanced mix of power and limitations, Node.js remains a versatile platform for dynamic, scalable web solutions across industries. If you’re looking to build a high-performance web application, it’s wise to hire Node JS developers who can leverage its full potential and optimize it for your specific needs.

              FAQs:

              What is Node.js?

              Node.js is a JavaScript runtime built on Chrome’s V8 engine, allowing fast server-side applications.

              Why is Node.js so popular?

              Its non-blocking I/O and event-driven architecture make Node.js highly efficient for web apps.

              Can Node.js handle heavy traffic?

              Yes, Node.js handles high concurrency effectively, making it ideal for scalable applications.

              What are the disadvantages of Node.js?

              Node.js may struggle with CPU-intensive tasks and lacks a multi-threading approach.

              Is Node.js ideal for real-time applications?

              Yes, its event-driven model is perfect for real-time applications like chat apps or live updates.

              Can Node.js be used for mobile apps?

              Node.js can be used for building cross-platform mobile apps with frameworks like React Native.

              What type of applications is Node.js best for?

              Node.js is best for real-time, data-heavy applications like chat apps, games, and collaborative platforms.

              Can Node.js be used for APIs?

              Yes, Node.js is widely used to build RESTful APIs and is great for handling JSON data.

              Does Node.js support database integration?

              Yes, Node.js easily integrates with NoSQL (MongoDB) and SQL databases like MySQL or PostgreSQL.

              Can Node.js be used for enterprise apps?

              Yes, Node.js is increasingly used for building enterprise-level applications due to its scalability and speed.

              7 Key Differences Between MongoDB and MySQL

              Databases store and manage data. They help websites and apps run smoothly. Over 92% of websites use a database. Databases handle user accounts, payments and content.

              Choosing the right database improves speed, security and scalability. For example, Facebook uses multiple databases like MongoDB to handle 350 million photo uploads daily. Small businesses may use MySQL for structured data. A poor choice can slow performance. For instance, Amazon handles 600 sales per second using scalable databases.

              So what are MongoDB vs MySQL Databases? They also help businesses manage information efficiently. A relational database like MySQL ensures data consistency using ACID properties. MongoDB, a NoSQL database, offers schema flexibility and JSON storage for unstructured data. Performance depends on data structure and query language.

              In this article, we will be discussing MongoDB vs MySQL – the key difference between MongoDB and MySQL. Side by side we will also look into the benefits of MongoDB over MySQL as well as when to use MongoDB and when to use MySQL. Let’s start:

              What is MongoDB?

              MongoDB is a NoSQL database. It stores data as flexible JSON (JavaScript Object Notation) like documents. Over 31,000 companies use MongoDB, including eBay and Adobe. It handles large, unstructured data efficiently. It supports horizontal scaling, meaning it distributes data across multiple servers. This improves speed and performance.

              MongoDB processes 100,000+ queries per second in high-traffic applications. It is great for big data, real-time apps and IoT. Example: Uber uses MongoDB to manage millions of real-time ride requests.

              What is MySQL?

              Structured Query Language

              MySQL is a relational database. It organizes data in structured tables. Over 50% of databases worldwide use MySQL. It follows SQL (Structured Query Language) for managing data. It is best for applications needing strong relationships between data.

              MySQL powers Facebook, Twitter and YouTube. It handles billions of queries daily with high security. Example: PayPal uses MySQL to manage 300+ million user transactions securely. It is ideal for banking, e-commerce and government records.

              Also Read: Laravel vs NodeJS

              MongoDB and MySQL Compared Feature-wise:

              Please check the table below for a detailed feature-wise comparison of MongoDB and MySQL.

              Feature🟢 MongoDB (NoSQL)🔵 MySQL (SQL)
              📂 Database TypeNoSQL (Document-oriented)SQL (Relational)
              📊 Data ModelFlexible schema with collections and documentsStructured data with tables and rows
              📝 Query LanguageMongoDB Query Language (MQL)Structured Query Language (SQL)
              📈 ScalabilityHorizontal scaling (sharding)Vertical scaling (replication & clustering)
              ⚡ PerformanceHigh performance with large datasetsExcellent for complex queries & joins
              ✅ Data IntegrityEventual consistency (no full ACID compliance)Strong consistency with full ACID compliance
              📜 SchemaNo predefined schema; flexible schema designFixed schema with predefined tables & columns
              🔄 TransactionsLimited multi-document transaction supportFull ACID support for multi-row transactions
              🎯 Use CasesBig Data, CMS, Real-time AnalyticsBanking Systems, E-commerce, Enterprise Applications
              🔁 ReplicationReplica sets for high availabilityMaster-slave replication
              📌 IndexingSupports various indexes (hashed, compound)Supports various indexes (primary, unique, full-text)

              Key Differences Between MongoDB and MySQL

              Each database is best suited for different use cases. MongoDB is ideal for scalable, flexible applications, while MySQL ensures data consistency and security.

              1. Database Structure:

              Structured MySQL vs flexible MongoDB

              MongoDB is a NoSQL database that stores data as documents inside collections. It is like storing different types of notes in separate folders. MySQL, a relational database, organizes data in structured tables. In simple words the difference between MongoDB and MySQL, the latter is like an Excel sheet with fixed columns.

              MongoDB Vs MySQL Example- It can be best explained by social media platforms like Twitter. Benefits of MongoDB over MySQL come in where Twitter posts have different attributes. Thus, Twitter takes advantage of MongoDB’s flexible structure. A banking system, requiring strict relationships between accounts, fits MySQL.

              2. Data Storage Model:

              MongoDB uses BSON (Binary JSON), allowing arrays and nested documents. MySQL uses a traditional row-column format. So when to use MongoDB and when to use MySQL?

              Example- In an e-commerce app, MongoDB can store product details as a document with various attributes (color, size, brand). Here the difference between MongoDB and MySQL, is that the MySQL would store each attribute in a separate table, requiring multiple joins to retrieve all details.

              3. Schema Flexibility:

              MongoDB scalability vs MySQL structure

              MongoDB vs MySQL performance  – MongoDB is schema-less, meaning each document can have different fields. MySQL requires a predefined schema.

              MongoDB Vs MySQL  Example- A blogging platform where each article can have different metadata (author, images, tags) works well with MongoDB. A payroll system that needs uniform fields (salary, tax, employee ID) is best in MySQL.

              4. Scalability:

              MongoDB scales horizontally (sharding), distributing data across multiple servers. MySQL scales vertically (adding CPU/RAM). So when to use MongoDB and when to use MySQL?

              Example – Amazon, handling millions of transactions daily, uses MongoDB for scalable performance. A small business inventory system may rely on MySQL without needing multiple servers.

              5. MongoDB vs MySQL Performance & Speed:

              Programmer coding MySQL and MongoDB

              The key benefit of MongoDB over MySQL is that the former is faster for high-volume reads/writes, while MySQL is better for complex queries.

              MongoDB Vs MySQL Example – A ride-sharing app like Uber benefits from MongoDB’s speed. A stock trading app, requiring precise transactions, prefers MySQL.

              6. Query Language:

              Another difference between MongoDB and MySQL is that MongoDB uses MQL (JSON-based). On the other hand, MySQL uses SQL.

              Example – A real-time analytics dashboard benefits from MongoDB’s flexible queries. A hospital management system uses MySQL for strict relational queries.

              7. Security Features:

              Both databases offer authentication and encryption. MySQL has built-in encryption, while MongoDB needs extra configuration.

              MongoDB Vs MySQL Example – A banking app prefers MySQL for its strong encryption. A gaming leaderboard, prioritizing speed, benefits from MongoDB.

              Also Read: What is the Best Way to Hire Full Stack Developers?

              When to Use MongoDB and When to Use MySQL?

              When to choose MongoDB or MySQL

              Use MongoDB when:

              • Data is unstructured or changes often. An example is a social media app storing posts, comments and reactions in different formats.
              • High-speed read and write operations are needed. Example is real-time analytics for an IoT system.
              • Scalability is important. For Example the E-commerce platforms handling millions of users.

              Use MySQL When:

              • Data needs strict relationships. Example is the banking systems managing accounts and transactions.
              • Complex queries and joins are required. Excellent example would be the Hospital databases tracking patient records.
              • Security and data integrity are critical. Worthy example is the government databases storing citizen data.

              Which Database Should You Choose?

              In 2024, the relational database market reached $74.09 billion, projected to grow to $83.98 billion in 2025. Oracle leads the market, with MySQL and Microsoft SQL Server also among the top five databases. Cloud-based databases are expected to reach $123.4 billion by 2032, growing at a CAGR of 20.6%. So if you wish to know more on MongoDB vs MySQL which ones will suit your business? Or when to use MongoDB and when to use MySQL for the same business that you are running? Then do contact us, our experts will guide you at every step of the process.

              FAQs:

              What is the main difference between MongoDB and MySQL?

              MongoDB is a NoSQL document-oriented database, while MySQL is a relational database (RDBMS) that stores data in tables with structured schema.

              Is MongoDB faster than MySQL?

              MongoDB offers faster query execution for unstructured data and big data applications, while MySQL performs better with complex joins and structured queries.

              Does MongoDB use SQL queries?

              No, MongoDB uses the MongoDB Query Language (MQL) instead of SQL, making it more flexible for handling unstructured and semi-structured data.

              What data structure does MySQL use?

              MySQL organizes data in tables with predefined schemas, enforcing relationships through primary keys and foreign keys for structured data management.

              How does MongoDB store data?

              MongoDB stores data in BSON (Binary JSON) documents, which allows for schema flexibility and nested data structures.

              Which is better for big data?

              MongoDB is preferred for big data and real-time analytics due to its ability to handle large-scale distributed data efficiently.

              Does MySQL support NoSQL features?

              MySQL does support JSON data types, but it lacks the schema flexibility and scalability of a true NoSQL database like MongoDB.

              What industries use MySQL the most?

              MySQL is widely used in banking, e-commerce, and enterprise applications, where structured data integrity is crucial.

              Where is MongoDB mostly used?

              MongoDB is popular in IoT, content management, and real-time applications, where scalability and schema flexibility are essential.

              Can I use MongoDB and MySQL together?

              Yes, hybrid solutions use both databases, where MongoDB handles unstructured data and MySQL manages relational data for efficient processing.

              Is MongoDB cloud-friendly?

              Yes, MongoDB supports cloud-based deployments like MongoDB Atlas, offering seamless database-as-a-service (DBaaS) scalability.